

iPhone batteries lose efficiency over time. You may notice your phone running out of charge faster, shutting down unexpectedly, or showing incorrect battery health information. For retail customers, individual users, and private phone repair enthusiasts, visiting a repair shop can be costly. The good news is that, with proper tools and guidance from trusted providers like PhoneFix, it is possible to safely perform a self-repair battery for iPhone at home.


DIY battery replacement can save both time and money. Using a high-quality mobile repair kit and following step-by-step instructions ensures the process is safe and effective even for beginners.
Overview of the Mobile Phone Repair Industry
The mobile phone repair industry has grown rapidly due to the increasing number of smartphone users. Today, a wide range of customers, from retail and private users to professional phone repairmen and phone repair stores, rely on specialized tools to fix device issues efficiently. With the availability of mobile repair kits and diagnostic tools, even individual users can safely perform many repairs at home.
Using reliable tools and high-quality replacement batteries ensures the repair process is safe, effective, and professional in quality. This approach benefits both DIY enthusiasts and small repair shops that want to optimize repair outcomes while controlling costs.
When Your iPhone Fails: Where to Repair
Sometimes battery issues are not the only problem, or you might feel unsure about DIY repairs. In these cases, visiting a professional repair shop is the safest choice. Phone repair shops, professional cell phone technicians, and private repair technicians can handle more complex issues such as screen damage, motherboard problems, or water damage. However, for standard battery replacements, a DIY approach using a mobile repair kit from PhoneFix is sufficient for most users.
Understanding the Tools You Need
Before starting any repair, it is essential to have the right tools. A complete mobile repair kit usually contains everything required. Using proper tools improves safety, ensures components are handled carefully, and reduces the chance of mistakes.
Essential Tools for DIY iPhone Battery Replacement
- Pentalobe screwdriver for removing screws near the charging port
- Phillips #000 and Tri-point Y000 screwdrivers for internal screws
- Plastic spudgers and opening picks to lift the screen safely
- Suction cup to help separate the screen from the phone body
- Tweezers for handling small screws and connectors
- Heat gun to soften adhesive around the screen
- Mobile repair kit containing all necessary components
How to Repair Your iPhone Battery
Step one is to check the health of your battery in the device settings. If the maximum capacity is below 80 percent, replacement is recommended. Power off your iPhone completely and discharge the battery below 25 percent to reduce the risk of fire during the repair.
Carefully open the device using a suction cup and plastic opening picks. Apply a heat gun along the screen edges to soften the adhesive. Remove the screws securing the screen and internal components using the appropriate screwdrivers. Carefully disconnect the battery connector and gently remove the old battery. Avoid bending, puncturing, or crushing the battery.
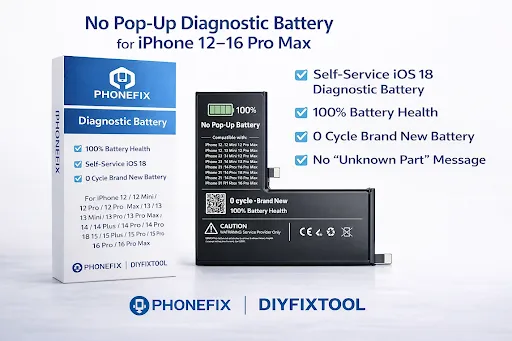
Install the new battery by positioning it correctly and reconnecting the battery cable. Ensure all internal screws and components are restored to their original positions. Finally, reattach the screen and power on the device. Use an iPhone diagnostic battery tool to confirm the new battery is working correctly and that the device displays accurate readings.
Step-by-Step Quick Reference
- Check battery health and power off the iPhone
- Discharge battery below 25 percent
- Open the device with suction cup and plastic picks
- Apply a heat gun to soften adhesive
- Remove screws and disconnect the old battery
- Install new battery and reconnect cables
- Reassemble the device and test with diagnostic tool
Safety Tips to Follow
Working with lithium batteries requires extra care. Do not bend or puncture the battery. Avoid using metal tools directly on the battery and always discharge it below 25 percent before starting. Keep your workspace organized and well-lit to prevent mistakes and protect internal components. Take your time for each step to avoid accidental damage.
Safety Checklist for DIY Users
- Discharge battery below 25 percent
- Do not bend, puncture, or crush the battery
- Use plastic tools for handling components
- Keep screws and small parts organized
- Work in a clean and well-lit area
Conclusion
DIY iPhone battery replacement is safe, cost-effective, and rewarding if approached carefully. Using a complete mobile repair kit from PhoneFix and high-quality batteries ensures professional-level results. Testing the battery with an iPhone diagnostic battery tool confirms correct functionality. Following the recommended steps, observing safety precautions, and using proper tools allow individuals to perform iPhone battery repairs confidently at home.


